| Feature |
The How
To's |
Dual Time Machine Support |
Applications now support two Time Machines in the GlobeCaster.
There have been a number of changes in order to support a dual Time Machine system.
Both Time Machine Format and Time Machine Report invoke a dialog box
that requires the user to select which board to format or test, respectively.
In Switcher, a TMClip Playback/DDR Panel has been added that
allows the user to record TMClips on the record (1st) channel of both Time Machines.
Futhermore, in order to distinguish between the Time Machines being used when loading a
TMClip as a source object, rather than using TM1 and TM2, the softbutton label
has a number that represents the slot and a superscript for the channel. For instance,
a TMClip softbutton that uses the 2nd channel of the Time Machine on slot 6 has label TM6². |
Improved Bin Management |
A number of improvements have been made to the Bin functionality:
The mouse wheel now scrolls the bins
The state of the Advanced button is saved in the playout file
The picon animation routines now support TMClip and TMBackup files
Bins no longer disappear behind panels that are opened and then re-opened over another panel
|
PPT2Stills Application
(Export Tool) |
New PowerPoint To Stills export utility application for
exporting PowerPoint files to "FrameStore slides" (Stills).
To export a PowerPoint file to a series of stills, the user simply performs the following operations:
Use the dropdown selector to choose the format of the FrameStores to export (NTSC or PAL)
Select the PowerPoint file to export via the Choose PowerPoint File Browse button, which pops up a standard Windows Open dialog box
Select the name of the file(s) to save to via the Save to File Browse button, which pops up a standard Windows Save As dialog box
Click on Export to export the files with the specified name
Each file will represent a slide and will be named with the given name, appended by a number and .tfs.
For instance, if a PowerPoint file has 17 slides and the save name is specified as Sample.tfs,
the resulting files would be named Sample01.tfs, Sample02.tfs,..., Sample17.tfs.
|
VGA Input Application |
A separate install will soon be available for download that allows the user to grab video from
a VGA monitor and send it to a DSK. This is accomplished via a server and client application
to transfer a VGA monitor's screen data from one computer to the host PC, and then a Grab2DSK application
that sends the screen data to the DSK. More documentation will be provided in the install. |
Mouse wheel support |
The mouse wheel will now scroll the bins, timelines, and appropriate controls (number boxes, timecode boxes) |
Improved Serial Devices Panel |
The user can configure a port to be connected to an External Video Router
or a BRC300 Camera. In order to connect to a BRC300 camera or External Video Router, the
port must be assigned to the specific type of device. |
Drag/drop Settings (Props Archive) |
The user may drag the slot button of the Advanced Input Settings or Output Settings
button to a bin in order to save the settings of the decoder or encoder, respectively, to a file.
The user may then drag the resulting file from the bin onto the slot button to reload the settings.
The user may also load the settings files via the
GC Macro Manager's Indexed Load command. |
Improvements to
GC Macro Manager |
New commands have been added to the Macro language. They are listed below:
Indexed Load: Load a Color Correction, Color Effect, or Props Archive file to a specified slot
Bin Action: Select or activate the current, next, or previous bin item
VTK Chroma Key: Specify chroma keying on or off for a slot in the VTK interface
NOTE: A separate install has been created for the CS-1000 which includes the GC Macro Manager
application and accompanying documentation. CS-1000 users who install 3.2 should also download
and install the CS-1000 installer. |
|
|
Switcher
|
| Feature |
The How
To's |
|
|
The GlobeCaster now supports RS-422 control of an external video router. This allows the user
to switch more than 8 inputs. If the user intends to do transitions (e.g., dissolves,
wipes, etc.) between two sources on the router, two GC input cards are required to connect
to two Router outputs. If three source effects are used, then there should be three
GC cards connected to three Router outputs.
Once the user has connected the router's RS-422 port to the GlobeCaster's RS-422 port and connected
the video outputs to GlobeCaster inputs, the user needs to describe the current configuration.
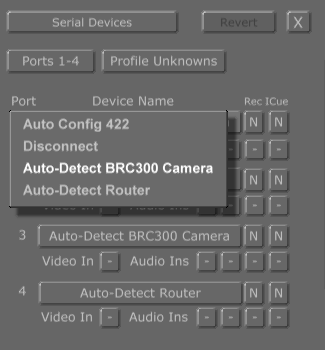
Serial Devices Panel
Open the Serial Devices panel from the Configure menu. Click on the Device Name button
and select the menu item "Auto-Detetct Router". In the diagram
shown here, the popup menu is visible and
serial port 4 has been selected to automatically detect a router.
Router Settings Panel
The Router Settings Panel has been added so that the user can
describe the video connections between the Router and the GlobeCaster.
The basic controls are described below:
| Router Selector |
Clicking on this button pops up a menu that allows the user to select
one of the routers that have been detected. Select a router to view its information,
specify its mapping, or send advanced commands. |
| Router Information |
Clicking on this button pops up a menu that simply lists the
detected information about the selected router. Click anywhere to close the menu. |
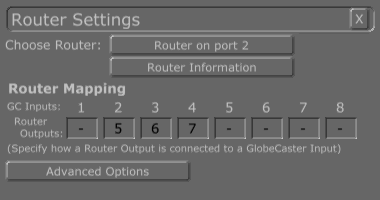
| Router Mapping |
A list of 8 numberboxes that lets the user specify which Router Outputs are
connected to which GlobeCaster inputs. In the diagram shown,
Router Output 5 is connected to the GC input card on slot 2, Router Output 6 is connected
to input 3, and Router Output 7 is connected to input 4.
When a new router is selected (or when Switcher is closed), these values are stored.
If a router is detected on the same port when Switcher is opened again,
these values are automatically loaded. Naturally, the user should only configure one
GC Input card to a single router.
|
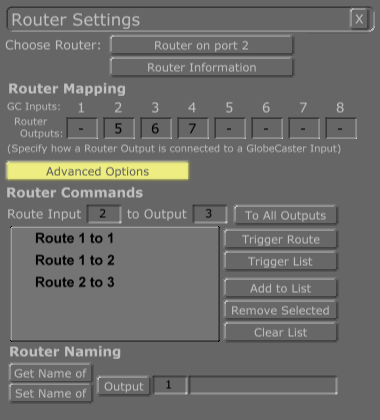
| Advanced Controls |
A toggle button that lets the user hide or show the
advanced controls, which allows the user to
directly send commands pertaining to routing and naming. (Some controls
may be disabled if the router does not support the corresponding commands.) |
The advanced controls, that allow the user to send direct commands to the Router
(but are not necessary for configuration), are listed below:
| Route Input |
Numberbox for specifying the router input. |
| To Output |
Numberbox for specifying the router output. |
| To All Outputs |
Clicking on this button sends a command to the router to route the
specified input to all outputs. |
| Trigger Route |
Clicking on this button sends a command to the router to route the
specified input to the specified output. |
| Trigger List |
Clicking on this button sends commands to the router to perform the
route items shown in the Route Listbox. |
| Add to List |
Adds a route item (routing the specified input to the specified output)
to the Route Listbox. |
| Remove Selected |
Removes all of the selected (checked) route items from the Route Listbox. |
| Clear List |
Removes all items from the Route Listbox. |
| Get Name |
Sends a command to get the name of the specified router object type and index.
The result is printed in the editbox next to the index. |
| Set Name |
Sends a command to set the name of the specified router object and index
with the specified text in the editbox. |
| Router Object Type |
Clicking on this button invokes a popup menu that lets the user specify
the router object type (Level, Input, Output). |
| Object Index |
Numberbox that lets the user specify which Router Object to get or set the name of. |
Warning: Not all routers support the functionality available through the advanced controls (such as
routing an input to all outputs, or naming inputs and outputs). When a router does not support advanced
functionality, the corresponding controls are disabled.
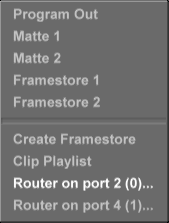
Router softbuttons
Once the user has specified how the GlobeCaster's inputs are connected to the Router outputs via the
Router Mapping, the user can now select router inputs via the softbuttons.
To create a router softbutton, right-click on one of the busrow buttons; if routers have been detected,
there will be a menu item available for each one, Router on port #...
(see Softbutton menu diagram below.)
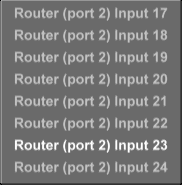
Clicking on the router menu item will invoke a second menu that lets the user choose from:
Inputs 1-8, Inputs 9-16, Inputs 17-24, Inputs 25-32 (see Router Submenu 1 diagram below.)
Clicking on one of these menu items then invokes a final menu (Router Submenu 2)
that lets the user select a specific input. Selecting one of the input menu items changes
the softbutton to be a router input and is labelled as Rp:i, where p
is the port number and i is the input number.
(For instance, R2:23 represents input 23 of the router connected to port 2.)
 |
 |
 |
| Softbutton menu |
Router Submenu 1 |
Router Submenu 2 |
At this point, the user can select a router input on any of the video busrows as if they were
regular inputs. A router softbutton can be created on any of the 16 buttons
on the busrow.
There are a few issues the user should be aware of:
- It is the user's responsibility to provide a cable that connects the GlobeCaster RS-422 Serial Port
to the router's RS-422 port. A document is provided at the GlobalStreams download site as to how
such a cable can be created.
- All sources should be genlocked with the GlobeCaster and the router should contain
a vertical interval synchronization board so any cuts occur at the proper time to prevent glitches
- Since multiple sources will be routed to the same GC input card, it is recommended that
sources that require Color Correction be connected directly to a GC input card
|
|
| The TMClip Playback/DDR Panel has been added.
There are three sections to this panel, which are enumerated and discussed below.
Playback functionality
The TMClip Playback controls are at the top of the panel. There are a number of controls
that are similar to Editor's Left Monitor controls as well as Editor's Clip Main Properties controls.
The controls are described below:
| TM Selector |
Clicking on this button pops up a menu that allows the user to select a TMClip
currently loaded on the Switcher softbuttons for playback and editing.
This button's menu also allows the user to select the TMClip Playlist for playback,
or the playlist's individual clips for editing. |
| Playback timecode box |
Displays current timecode of the selected clip (or TMClip Playlist).
The user can also enter the desired timecode here and press the Enter button on the keyboard
in order to move the clip to the specified timecode. |
Shtl, Jog,
Lock buttons and Knob |
The Shtl (Shuttle) and Jog buttons are mutually exclusive buttons
that determine the speed at which the user can traverse through the TMClip via the Knob.
When the Shtl button is selected, the user can traverse the clip with speeds greater than
normal playback speed. When the Jog button is selected, the user can traverse the clip
with fractional speeds. When the Lock button is on, releasing the knob with the mouse
will return the knob to the default 0 position and pause the clip; if the button is not on,
the knob will retain its position and the clip will continue shuttling at the current speed.
The current speed in which the user traverses the clip is shown above the knob.
|
| Transport Controls |
The transport controls are, from left to right:
Go to First Frame, Rewind, Reverse Play, Jog Back 1 Frame, Pause,
Jog Forward One Frame, Play, Fast Forward, Go to Last Frame |
Mark In/
Mark Out |
As a clip is playing, clicking Mark In specifies the clip's in point, which clicking
on Mark Out specifies the clip's out point. |
In Point/
Out Point
Timecode |
Displays the in and out points of the selected clip. Mark the in and out points
by cueing to the desired point and clicking the Mark In, Mark Out buttons. Or, you can
enter the desired timecode here and press the Enter button on the keyboard. |
| Cue In |
Moves the source to the position shown in the In Point timecode box. |
| Cue Out |
Moves the source to the position shown in the Out Point timecode box. |
| Playback Speed |
Adjusts the playback speed and direction for the selected TMClip. The user can
edit the numberbox to type in a specific speed, or click on the button to invoke a pop-up menu
with the following options: 8x Rev (Reverse), 4x Rev, 2x Rev, Reverse, Half Rev,
Quarter Rev, Quarter Fwd (Forward), Half Fwd, Normal, 2x Fwd, 4x Fwd, 8x Fwd. |
| Loop Count |
Lets the user specify the number of times the TMClip loops by entering the number
into the numberbox. Alternatively, the user can turn on the Infinite button so the clip
loops continuously. |
| Video Rate |
Clicking on the Video Rate button invokes a popup menu with the following
options: Run, Field Freeze, Frame Freeze, Strobe. Run plays the clip normally, Field/Frame Freeze
displays the first field/frame of a clip and holds it for the duration of the clip, and Strobe
stutter-steps the clip as if a strobe light was going off. When Strobe is selected, the Strobe
Rate numberbox is enabled and allows the user to type in a strobe rate for the clip. |
| Clip Info |
Displays the name of the clip. |
| Component |
Displays the components of the clip selected for playback. Clicking on the
button invokes a popup menu that allows the user to check on or off the available compoents. |
Digital Data Record functionality
When the TMClip Record button is on, the TMClip Record controls, below the playback controls, are visible.
There are a number of controls that are similar to the VTR Transport Panel,
but this panel differs in that the user may record on two different Time Machines simulteneously.
The controls are described below:
Rec TM1/
Rec TM2 |
Specifies that a TMClip should be recorded on the first Time Machine/
second Time Machine (if it exists). |
| Record Volume |
Displays the name of the Time Machine Volume to which the clip will be recorded.
Clicking on the button will invoke a popup menu that allows the user to select which volume
to record the clip on. |
| Record Component |
Displays the components that will be recorded to the clip.
Clicking on the button will invoke a popup menu that allows the user to select which
components should be recorded. |
| Record Source |
Displays the components of the clip selected for playback. Clicking on the
button invokes a popup menu that allows the user to check on or off the components
to be recorded. |
| Record Button |
Starts recording (or starts the record countdown). |
| Stop Button |
Stops recording (or stops the record countdown). |
TMClip Length/
Record Delay |
Timecode box that displays the approximate number of frames that
have been recorded while recording a Time Machine clip. This timecode box can
also be used to enter a timecode that specifies a delay before recording;
simply type in the delay (e.g., 00:00:05:00 for five seconds), press the keyboard's
Enter key, right-click on the timecode box and select the menu item
Save as default delay value. The next time the Record Button is pressed,
the timecode will show the delay value counting down until it reaches 0, at which point
the Time Machine will start recording and the timecode will display the approximate number
of frames that have been recorded.
Right-clicking on the picon invokes a popup menu with the following options:
Save as default delay value, Reset to default delay value, No delay (record immediately). |
| Recorded Clip Picon |
The picon of a recorded Time Machine clip. The clip(s) can be
saved by dragging-and-dropping them into a bin. If only one clip was recorded,
right-clicking on the picon invokes a popup menu with one option: Set Picon.
If two clips were recorded simultaneously, right-clicking on the picon invokes
a popup menu with the following options: Set Picon 1, Set Picon 2, Set Both Picons. |
| New Clip |
Clears the clip(s) and starts a new one. |
| Save Clip |
Saves the recorded TMClip(s) to the default bin set in the
Global Settings panel. Clip(s) can also be saved by dragging-and-dropping
the Digitized Clip Picon into a bin. |
| Volume Free Space Gauge |
Shows the selected Time Machine Volume name and displays a graphical
representation of the amount of space used (in red) and the free space left (in green)
on the video and audio drives of that volume.
Clicking on this button invokes a popup menu that allows
the user to select a volume (connected to any Time Machine) in order to display the
used and free space as a graphical representation. |
| Status Box |
A label that displays any status error messages. |
Playlist functionality
When the TMClip Playlist button is selected, the TMClip Playlist Bin is
shown
and the TMClip Record controls are hidden. The user can drag and drop TMClips into the bin.
The user can use the TM selector at the top to select one of the clips in the playlist (PL#)
and edit its attributes (e.g., components, speed) via the playback controls.
The user can also select the clip by left-clicking on its picon in the bin.
(Playback is not supported for the individual clip).
The small picon to the right of the TMClip Playlist button is the TMClip Playlist picon.
The user can right-click on it to invoke a menu to reset the picon.
The user can drag the picon and drop it in a bin to save the TMClip Playlist,
which saves with a .cpl extension (for Clip PlayList).
The user can then drag the file from the bin and drop it on the picon to reload the playlist.
To play the TMClip Playlist on Program, the user must do two things:
- Click on the selector button to invoke the menu and select the Playlist menu item,
which prepares the TMClip Playlist and provides VTR control for playback.
- Right-click on one of the softbuttons to invoke the menu and select the Clip Playlist item.
This will load the Clip Playlist softbutton (CPL). Select it on Program, or select it on Preview
and do a Cut (or Auto). This should start playing the playlist. (The TMClip Playlist only starts
automatically immediately after it's been prepared and selected, just like a TMClip.)
When "Playlist" is selected, the user has limited VTR control through the clip. The user can play,
pause, skip to next clip, and skip back to previous clip. The user can double-click on a clip in
the TMClip Playlist Bin to automatically move to that clip. If the TMClip Playlist is playing,
moving to a new clip should keep playing, with the following exceptions:
- If playing the first clip, skipping back will pause on the first frame
- If playing the last clip, advancing forward will pause on the last frame
The TMClip Playlist Bin is similar to a regular bin's Clip view method.
Each clip has a row with multiple fields (many of which correspond to the playback edit controls),
as described below:
| Icon |
The clip's picon. |
| Name |
The clip's name. |
| Duration |
Duration of the clip, as determined by the Mark In/Out points, speed, and loop count.
Note that the duration field will be updated when any of these attributes are modified. |
| Mark In |
The clip's In point. |
| Mark Out |
The clip's Out point. |
| Speed |
The clip's speed. |
| Loop |
The clip's number of loops. |
| Components |
The clip's video and/or audio playback components. |
The user can edit the TMClip Playlist by dragging in new clips, removing existing clips
(right-click on the picon to get the item menu), or re-ordering the clips. Note that the
TMClip Playlist Bin has its controls disabled--it is always using this specific size and
format, and manual ordering is always on. To reload the TMClip Playlist, select
"Unload Playlist" from the selection menu and then select "Playlist" again to re-prepare it.
The user can also unload the TMClip Playlist by right-clicking on the CPL softbutton and selecting
"Unload Clip Playlist" from the menu.
The TMClip Playlist Bin is also useful for simply storing frequently used TMClips.
The user can drag a TMClip from the TMClip Playlist Bin onto an empty softbutton to load
one of the clips.
|
VTR Panel Enhancements
| There are two improvements to the VTR Panel:
Record Delay
Similar to the TMClip Playback/DDR Panel's Record Delay control,
the TMLen timecode (which shows the approximate number of frames recorded)
now supports the ability to specify a record delay. The user can enter a timecode that
specifies a delay before recording; simply type in the delay (e.g., 00:00:05:00 for five seconds),
press the keyboard's Enter key, right-click on the timecode box and select the menu item
Save as default delay value. The next time the Record Button is pressed,
the timecode will show the delay value counting down until it reaches 0, at which point
the Time Machine will start recording and the timecode will display the approximate number
of frames that have been recorded.
Right-clicking on the picon invokes a popup menu with the following options:
Save as default delay value, Reset to default delay value, No delay (record immediately).
Continuous TM Record
When the VTR Panel is closed, recording to the Time Machine will not be automatically cancelled.
However, if the user shuts down the Switcher application while recording, recording will stop and
a dialog box will popup to prompt the user as to whether to save the clip or delete it.
|
|
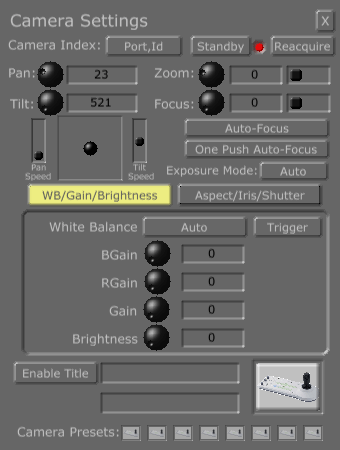
| The following changes were made to the Camera Settings Panel:
Added Exposure Mode dropdown menu button
Added right-click menu to joystick control for reversing pan, tilt, and image
Now properly enables or disables controls based on the Exposure Mode
When a camera is removed, an existing camera is not auto-selected
|
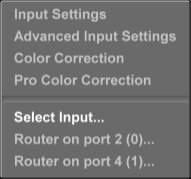
16 Softbuttons |
As discussed above, the softbuttons may be reconfigured to correspond to
an external video router input. The Blk button may now also be used as a router input.
In order to accomodate a large number of "softbuttons" that let the user select external video
router inputs on the bus row, the eight buttons reserved for input channels may now also be reconfigured
to correspond to an external video router input. This is accomplished by using the right-click menu
on an input button (shown below) and selecting a router in the menu and then selecting the router
input similar to the methodology discussed above.
The user can also change the order of the input buttons, if so desired, via the
Select Input... menu item, and the submenu, shown below.
 |
 |
| Input Channel menu |
Select Input menu |
Furthermore, the user may wish to save the current busrow configuration (rather than reconfigure
every time). This can be accomplished via the Switcher Options Panel's picon control.
(The options can be saved by dragging the picon and dropping it into a bin as a .swo file;
then the options can be reloaded by dragging the file from the bin and dropping it on the picon.)
The user can specify that the busrow's softbutton configuration, or "softmap",
should be saved in the options file via the picon's right-click menu: right-click on the picon
to popup the menu and select (enable) the Load/Save SoftMap in file menu item.
(This option is saved between executions of the Switcher application).
The right-click menu also has a Restore Standard Mapping menu item that will return
the busrow to its standard configuration (Blk, 1-8, Mat1, FS1, FS2, Out).
There are a few things to note:
The user can only select an input source or a router source for the eight input buttons.
The Blk button now acts more like a regular softbutton, but does not have a
matte color control or loop button associated with it.
The order of the status lights (if not hidden) does not change; they are still ordered
from inputs 1 to input 8.
The softmap only stores the position of the softbuttons; it does not store the sources' references.
For instance, it will know that FS1 was located on the right-most softbutton, but it will not know which
FrameStore was loaded in FS1. If a source that is no longer loaded is configured to be on a button, that
button will be unloaded.
|
True Toggle Key Support |
The Toggle Key button now allows the user to cut between a keyed source and a non-keyed source
without having to re-select the key source on Key Preview
|
TMClip Checking |
In order to prevent errors when recording to a Time Machine, additional resource checking has been added.
If a TMClip is loaded on channel 1, trying to record on the VTR/Live Digitize panel will report an
error: "Unable to record, TM used". Trying to record on the DDR Panel while channel 1 is in use
will popup a dialog box querying the user if Switcher should begin recording.
Furthermore, if recording to the Time Machine, channel 1 is considered reserved and no clips can use that
channel for playback. TMClips will be loaded to channel 2 instead, even if a clip is already loaded.
The new TMClip Playlist uses channel 2 for playback. If a playlist is in use when the user
attempts to load a TMClip, the clip will use channel 1 for playback. If channel 1 is in use for recording,
an error will be reported to the user: "Both TM Channels are already in use"
|
AP-100 support |
Added a Ext Mixer button to the Audio Mixer panel for selecting an external mixer (AP-100).
Details of the AP-100 protocol can be found in the AP-100 install document. |
New Accelerators |
Added new Switcher accelerators:
| Miscellaneous Accelerators |
| B |
Auto (a la Spacebar) |
| Ctrl+D |
Toggle TMClip Playback\DDR Panel |
| Ctrl+R |
Toggle Router Settings Panel |
|
|
|
|
Editor
|
| Feature |
The How
To's |
Improved Support for Live Sources |
Selecting Live from the Source Monitor's Source Type button will now replace the
Main Controls' Tape Name button (below the Source button) with the Live button.
Clicking on the Live button will popup the Live menu, which allows the user to select a live source,
as shown here.
When a live source is selected, the Source Monitor displays that source's video.
|
New Accelerators |
Added a new Editor accelerator:
| Miscellaneous Accelerators |
| Ctrl+D |
Create Dissolve (based on position bar) |
| Ctrl+Alt+S |
Save the Timeline |
| Ctrl+Alt+Shift+S |
Save the Clip |
|
|
|
Animator/Compositor
|
| Feature |
The How
To's |
Effect Action Track |
The user can now add events to an effect timeline that will trigger a cut during the effect's execution.
To add an event, place the position bar at the desired location on the timeline, right-click (where the
tick marks and timecode are) to display the popup timeline menu, and select "Add Cut Event".
This will create an "Effect Action" track (if it didn't already exist) and add an event.
Note that these Cut Events are triggered relative to the beginning of the effect;
they are not delayed if a pause or loop occurs.
An example of a track with two Cut Events is shown here.
|
Fade In/Out Settings |
Allows the user to specify the default Fade In & Fade Out values in the Workspace Panel
|
New Accelerators |
Added a new Animator/Compositor accelerator:
| Miscellaneous Accelerators |
| Shift+Alt+C |
Center Selected Strokes |
|
|
|
Time Machine Backup
|
| Feature |
The How
To's |
Mark In /
Mark Out |
The user can now specify a Mark In and Mark Out point before backing up, restoring,
or transferring Time Machine clips. This allows the user to save off a section of a
Time Machine clip rather than the entire clip in case memory is an issue.
The Mark In and Mark Out buttons, and their accompanying timecode boxes,
can be found underneath the position sliders. Clicking on a Mark In or Mark Out
button will use the current timecode of the position slider and copy it into the corresponding
timecode box. Selecting a new clip will reset the Mark points to their default values.
To clear a Mark point, the user can also click on the button again; if the position slider's timecode
matches the Mark point timecode, it will return to the default value.
In the picture shown here, the clip on the left has a Mark In
point of 00:00:01:04 and a Mark Out point of 00:00:04:19, while the backed up clip on the
right has mark points set to the default values. (A Mark Out timecode of 99:99:99:99 signifies
the last frame.)
|
Improved UI |
A number of improvements have been made to the interface, as described below:
- The user interface is more symmetrical: now the clip in the right listbox has its first, middle,
and last frames displayed, and the user can play or stop the clip
- Position sliders have been added so that the user may scrub through the TMClip quickly
- Mark In and Mark Out buttons (and labels) have been added so that the user can
specify in and out points by clicking on the buttons
- The Status box next to the Audio & Video progress bars shows the currently selected frame
of the selected backup clip
- The Volume slider is now bookmarked by Off and Full buttons
and a Mute checkbox has been added for muting the audio without having to change the slider
- Added the Disable TMClip Playback checkbox for disabling audio/video.
When this is enabled, the user can still backup and restore clips, but playback is disabled
so that the user won't accidentally play a clip on Program and steal focus from another application
(e.g., Switcher). This option is saved between executions of this application.
- Added a Backup To PC As... button that allows the user to
specify an alternate name for the backed up clip.
- A new column for each listbox has been added to show the video format (NTSC or PAL) of the clip
- Added a Save Log button to the Log dialog box,
which allows the user to save the log to a text file
- Added checkboxes for the Middle Frame and Last Frame picons on the right so the user can
disable scanning a TMClip Backup file (which can be time consuming)
|
|
|
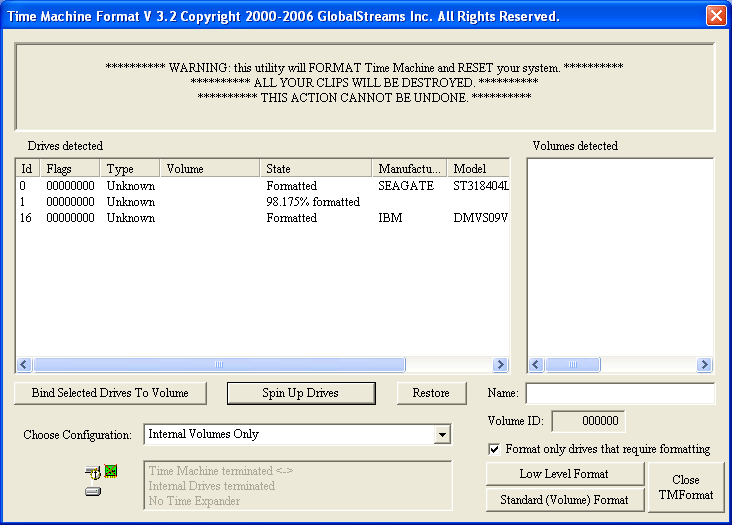
Time Machine Format
|
| Feature |
The How
To's |
Low Level Format |
The Time Machine Format application now supports Low Level Format as well as the
"high level" (standard) format that has been used in the past. To distinguish between the
two, the interface
has changed slightly by replacing the Do Format button
with the Standard (Volume) Format button, and adding a Low Level Format button.
The standard volume format simply reinitializes the allocation blocks.
Therefore, the standard format is quick, but doesn't actually delete the video and audio data;
the data is simply inaccessible.
A low level format, however, will reinitialize the entire drive's data. It will also
take much longer, possibly hours, depending on the size of the drive itself.
(The drives can all be formatted at the same time,
so it is recommended that the user do so in order to save time.)
To perform a low level format, the user selects the drive(s) to format and then clicks
on the Low Level Format button. A Reset will occur and then the user will be
queried to verify that each drive selected should be formatted.
When the drives are formatting, the progress is shown in the State column (as shown
here). The user should not turn the power off during a low level format;
the low level format will be aborted and the user will have to start the low level format over again.
It is also recommended that the user not perform a GlobeCaster Reset, or run any other application,
during a low level format.
|
| | | | |