| Feature |
The How
To's |
TitleBar support
(Focusing, moving, and resizing panels) |
Most panels now have a TitleBar associated with them. (This includes Bins
and Timelines.) Clicking on the TitleBar with the left mouse button will give
the panel focus. Clicking on the titlebar and dragging with the left mouse button will move the panel.
When a panel is dragged close to another panel,
the panel will snap into position so that it abuts the nearby panel.
A panel may be moved partially off-screen to the right or bottom. The current position of a panel
is stored in the layout file when the user saves the layout. Loading the layout will restore the
saved positions of the panels.
Opening a panel no longer hides the panels or bins that are either partially or entirely obscured
by the panel. To reveal a panel or bin that is partially or entirely obscured, the user needs to
click on its TitleBar to bring it to the front. (This may require moving a panel that is obscuring
the desired panel's TitleBar, or using the modifier keys discussed below.)
The color of a TitleBar will change when it gains or loses focus. The user can modify the
normal (passive) or focus color of a panel's TitleBar via the GC Application Color Editor application
(found in the GlobeCaster\Utilities program menu).
Click on the Choose Color popup menu and select the TitleBar (Passive) Color or
TitleBar Focus Color menu items to modify the color.
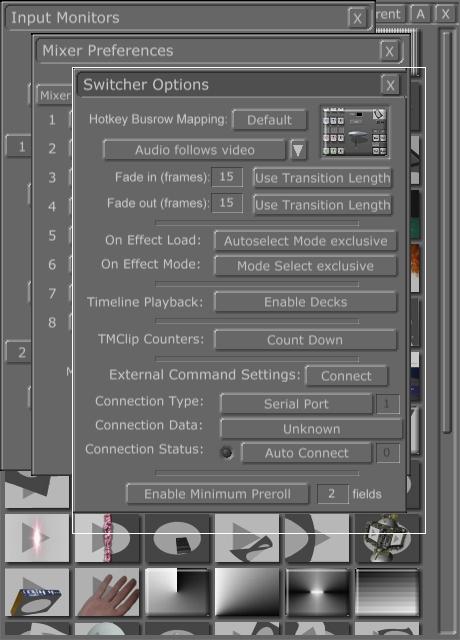
Here is an example of the Switcher application
with panels that have been moved so that they cascade, obscuring each other.
Note that the Switcher Options panel's titlebar is highlighted, indicating that
it has focus and was last selected.
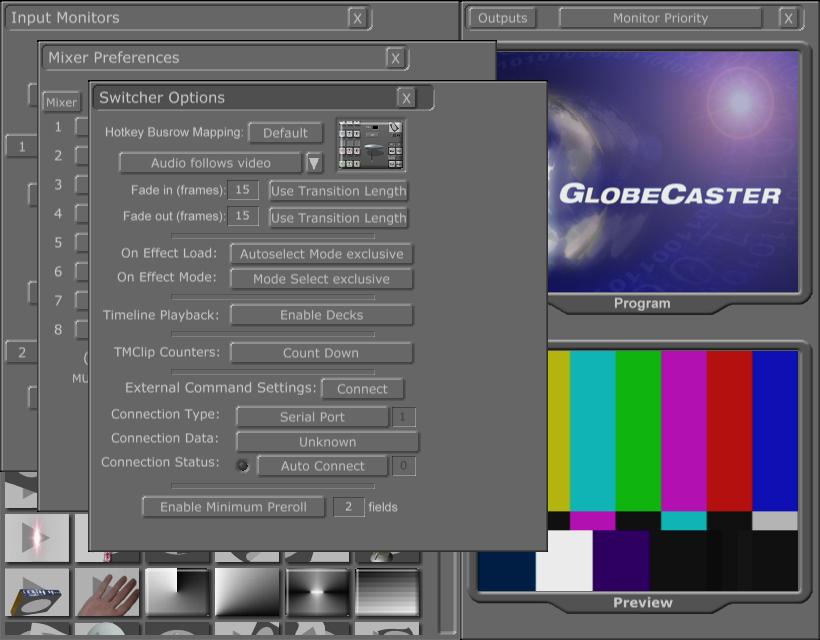
Additionally, many of the applications also have panels that are sizable (like bins). For instance, the Switcher application's
Switcher Options panel can be resized, as shown here. To change the
dimensions of a panel, the user can:
- click on the top or bottom edge and drag to resize the height
- click on the left or right edge and drag to resize the width
- click on one of the corners and drag to resize the width and height
Panels have a minimum and maximum size associated with them so there are limitations as to how far
they can be shrunk or expanded. Also, to make changes to the layout easier, a panel being resized will be clipped
by adjacent panels so as not to obscure a neighboring panel, similar to resizing bins. (See below
for overriding the clipping behavior.)
Modifier keys for focusing, moving, and resizing
Sometimes, the default behavior makes it difficult for the user to change the layout to the desired configuration.
Therefore, support has been added so the user may use modifier keys to change the behavior of the operations.
The usage of the modifer keys is discussed below:
Alt key: The user can press down the Alt key and then left-click on a panel to give it focus. This
is helpful when the TitleBar is obscured by another panel. This key can be used in conjunction with the other
modifier keys when moving or resizing a panel.
Shift key: The user can press down the Shift key and then left-click on a panel to begin moving the panel
without having to click on the TitleBar. This is useful when the TitleBar is obscured. Once the user has begun
moving the panel, the Shift key can be released. Alternatively, the user can hold down the Shift key while
moving the panel to disable the snapping functionality.
The Shift key can also be held down while resizing a panel in order to override clipping it to adjacent panels.
Control key: In order to resize a panel, the mouse must be positioned very close to the
panel's edge or corner, which can make resizing harder than necessary. In order to avoid this issue, the
Control key can now be used to resize the panel. When the Control key is pressed down and the left mouse
button clicked, the panel is split up into eight different areas, as described below;
each area corresponds to an edge or corner for resizing.
Top
Left
Corner
| Top
Edge
| Top
Right
Corner
|
| Left Edge
| Right Edge
|
Bottom
Left
Corner
| Bottom
Edge
| Bottom
Right
Corner
|
After the edge or corner has been determined, the mouse is moved to the appropriate position and resizing
can commence. The user can release the Control key once resizing begins. (The user can also use the
Shift key during resizing to disable clipping to adjacent panels.)
|
Improved Bin support |
As stated above, Bins now have a TitleBar, which exists where the bin's editbox used to be.
The TitleBar can be clicked and dragged to move the bin to another location.
The TitleBar's text specifies the current directory name that the bin is viewing .
In order to change the directory path, click on the A button to view the Advanced controls,
which now contain the directory editbox below the Parent, Home, Back, and Forward
buttons. A comparison between the two is shown here.
The comparsion figure illustrates additional features
available in Detail or Clip view, as discussed below.
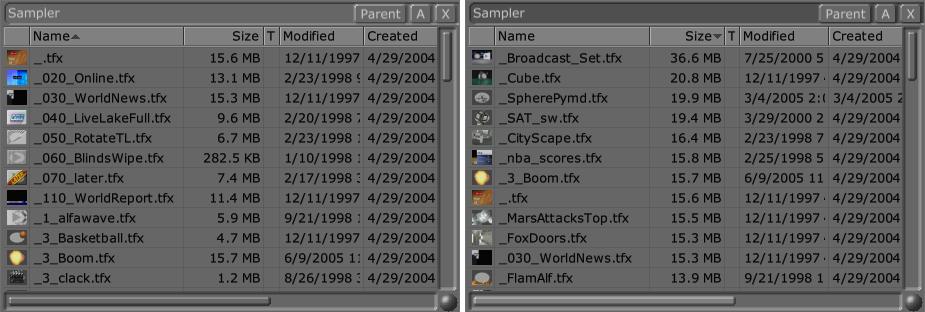
Bins are now sortable by clicking on the column header.
When the user clicks on a column header, the sort style is modified. When the user clicks on a column
that is not being sorted upon, that column will become the new sort style. When the user clicks on a
column header that is being sorted upon, the sort style is toggled between Ascending and Descending.
A triangular sort arrow is used to indicate which column is sorted and the direction in which it is sorted.
As shown in the figure, the sort arrow in the left Bin
indicates that the bin items are sorted by Name in ascending order,
while the sort arrow in the right Bin indicates that the bin items are sorted by Size in descending order.
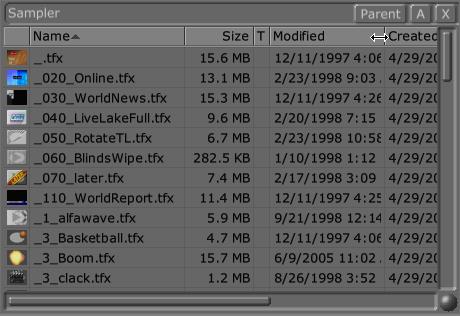
Bin widths can be resized
The user can now change the size of a column's width. To change the width of a specific column,
the cursor should be moved over the column header and positioned close to the column border between the
specific column and the column to its right. When that happens, the cursor changes to
a dual-headed horizontal arrow, as shown here.
Then click-drag the mouse to resize the width and release the button when finished.
In this figure, the Modified column is being widened.
When the user shortens the width of a column, the column's text is partially obscured.
If the column is being sorted upon and the column is shortened, the sort arrow will border the column divider.
There is a minimum width for each column so that the sort arrow is visible, and the user can widen the column later.
Added Creation Date column
The Detail view now has a Creation Date column labelled Created.
This column is adjacent to, and to the right of, the Modified column, as shown here.
2D Slider
A new control, the two-dimensional slider (or 2D slider), has been added so that the user can move
the bin both horizontally and vertically at the same time (rather than using both scrollbars).
The 2D Slider is the round control shown at the bottom right of the Bin. It is only visible when
both the horizontal and vertical scrollbars are visible, as shown here.
When the user left clicks on the control, the mouse cursor will be hidden. The user can then
drag the mouse horizontally and/or vertically to move the position of the bin; both scrollbars
will be automatically scrolled accordingly. When done, the user can release the button and the
mouse cursor will be shown again.
|
Clip Renaming support |
The user can now rename a Time Machine clip using the Time Machine Volume bin.
(Note that the TM Volume bin is also sortable and resizable.) Right-click on the
TM Clip's picon or name (in the Icon and Name column, respectively)
to bring up the menu, as shown here.
After selecting the Rename item, the name string will turn into an editbox where the new
name can be entered. After entering in the new name, a warning dialog box
will pop up, querying the user if the operation should continue.
The Renaming operation should not be taken lightly as there are repercussions. Any timeline that
contains this clip refers to it by its original name. When the clip's name is changed, the timeline can
no longer find it, and it will be up to the user to replace that clip with a new reference.
Furthermore, any clip shortcut (.lcp) files that reference the clip will no longer work
as they refer to the clip's old name. The dialog box warns the user of this issue.
It should also be noted that the Rename operation will fail if the clip is loaded in a Timeline or
loaded in a Switcher softbutton. The dialog box reminds the user of this issue.
|
Additional Software |
Additional software has been made available as part of the install, as shown here.
Simply check on the Additional Software box to install all components, or check on each
individual component to be installed.
There are four different components that the user has the option of installing, each of which is discussed below:
| CS-1000 |
Install for communicating with the CS-1000 Control Switcher. |
| CS-100 |
Install for communicating with the CS-100 Control Switcher. |
| GC Macro Manager |
Install for creating or editing macros, which can be invoked via the Control Switchers
or in the Switcher application. See below for details about running macros in
the Switcher application.
(The user now has the option of running the application in small resolution mode, which fits in a 1024x768 display.) |
| GC Preview Visualizer |
Install for previewing an effect (or framestore or Time Machine backup file) in software at full resolution.
(The user now has the option of running the application in small resolution mode, which fits in a 1024x768 display.) |
|
|
|
Switcher
|
| Feature |
The How
To's |
Individual
panel support |
As discussed above, panels now have TitleBars that allow the user
to specify panel focus and move the panels to different locations.
(If a panel is obscured by other panels, the user can use the Panels popup menu, or hotkeys, to
close and re-open the panel, which brings it to the front.) Most of the Switcher panels are
also sizable.
Additionally, many panel files are no longer mutually exclusive.
This figure shows the Input Monitors panel and Mixer Preferences panel
are partially visible and have been resized, while the Switcher Options panel has focus and is being resized.
(Compare with the normal panel sizes shown here.)
It should also be noted that, because panels can now be visible on top of other panels,
the 'small' resolution of the Switcher interface no longer uses
different Playout files depending on whether the Audio Mixer panel or Output Monitor panel is visible.
Hopefully, this change will prevent confusion when the user wants to customize the layout of the interface.
|
Macro Panel
(and bus rows) |
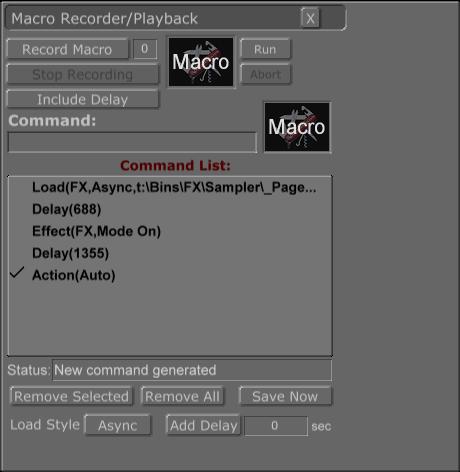
The Macro Recorder/Playback Panel, which lets the user record and/or
playback macros, has been added. The individual controls are discussed below,
as well as simple instructions on how to record and playback
a macro. A discussion of using a Macro busrow follows afterwards.
Macro Panel Controls
| Record Macro |
Clicking on this button starts the macro recording process. The commands it
records are appended to the commands that already exist. |
| Macro numberbox |
Enter the number of the macro to record or playback. The range is 0 to 79. |
| Stop Recording |
Clicking on this button will stop recording the macro.
|
| Include Delay |
Press this button down to keep track of the delay between commands. This may be
helpful for recording macros that load effects and then activate them as there is a delay between
commands necessary for processing the effect track. |
| Run |
Clicking on this button runs the macro commands shown in the Command List.
(It is not necessary to save the Command List in order to run the commands.) |
| Abort |
Displays the in and out points of the selected clip. Mark the in and out points
by cueing to the desired point and clicking the Mark In, Mark Out buttons. Or, you can
enter the desired timecode here and press the Enter button on the keyboard. |
| Command Editbox and Picon |
Shows the current command string and the picon associated with the command (such as the picon of the file to be loaded).
If the command string is too long to be shown entirely in the Command Editbox, the user can right-click on the Editbox to popup the entire string. |
| Command List |
Lists the macro commands. If the Command List text is shown in red, that means the
list has been modified from its original list and the user can click on the Save Now button
to save the changes. Left-click on a command to select it with a check-mark.
The user can right-click on a command to popup a menu that displays the entire string;
the user can click on the menu item to set it as the command in the Editbox (and Picon).
|
| Status |
Displays the current status of the panel. |
| Remove Selected |
Removes the command that is currently selected in the list. |
| Remove All |
Removes all commands in the list. |
| Save Now |
Saves the modified command list in the currently selected macro file. |
| Load Style |
The user can choose to load asynchronously (Async) or synchronously (Wait). |
| Add Delay |
Allows the user to add a Delay command. The delay (in seconds) can be specified
in the numberbox to the right of the Add Delay button. A decimal point can be used
to specify precision in milliseconds. |
Record functionality
| To record a macro, open the Macro Recorder/Playback Panel.
Set the macro number that you wish to record to in the Macro numberbox
(to the right of the Record Macro button). If this macro was already
populated with commands, you may click on the Remove All button to clear it.
Click on the Record Macro button to start recording. At this point, any actions taken that have
a corresponding macro command will be added to the Command List listbox. Also, the Command List
label will change to red to indicate that the macro has been modified. When all actions are complete,
click on the Stop Recording button. The user can save the macro by clicking on the Save Now button.
(If the user does not click on the Save Now button before editing the Macro numberbox,
the changes will be lost.)
Before saving the macro, the user has the option of making simple edits. A command can be removed by
selecting the line in the listbox and clicking on the Remove Selected button. A delay can be
added by selecting the line before which the delay should be added, entering the delay (in seconds),
and by clicking on the Add Delay button.
The user also has an option of introducing delays automatically in case timing is an issue.
For instance, if a user records a macro in which a DSK effect is loaded and then activated
via the Auto button without any delays, the macro would probably fail either because the DSK was still
busy loading, or the Auto track had not been updated by the time the Auto command was activated.
There are two solutions to this problem:
- Click on the Load Style popup menu button and change the style from Async to Wait.
That way, the next macro command will not be performed until the effect load was complete.
- Click on the Include Delay button (before Recording) to automatically add delay commands that
maintain the timing while recording. After the first command is recorded, the current time is cached.
After each successive command, the current time is retrieved and a Delay command is added using the difference.
|
Playback functionality
| To execute a macro, open the Macro Recorder/Playback Panel.
Set the macro number that you wish to execute in the Macro numberbox
(to the right of the Record Macro button). Click on the Run button to begin playback.
When the Run button has been pressed and playback begun, the Abort button is enabled.
The user may click on the Abort button to abort execution of the macro.
A macro does not have to be saved in order to play it back. The user can record a macro and populate the
Command List with macro commands. Then the user can click on the Run button to execute
the commands in the listbox. It should be noted, however, that macros can not be executed while recording.
|
Macro busrows
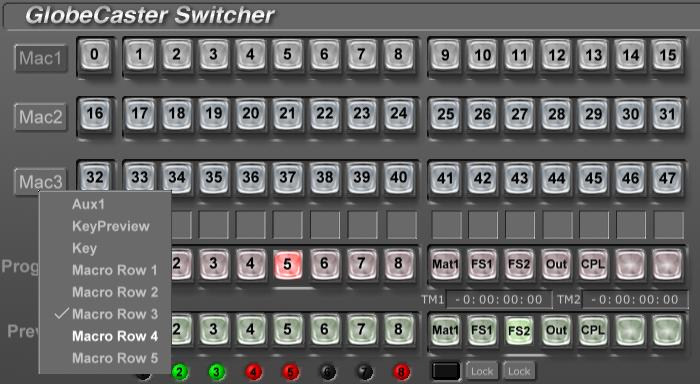
| Rather than using the Macro Recorder/Playback panel, the user can use the busrows to perform macros.
By clicking on the Busrow popup menu button (on the left), the user has the option of selecting between three video busses
(Key, KeyPreview, Aux1) or five different Macro Rows. Each macro busrow has 16 macros associated with it.
Clicking on a number in a Macro busrow will activate that specific macro.
In the figure shown here, the top three busrows have the first three Macro Rows selected.
The third busrow's popup menu button has been clicked, invoking the popup menu; the currently selected row is highlighted
with a checkmark.
When a macro busrow is selected, the user can still change the state of the (now hidden)
video busrow by accelerator keys if the Switcher Options are set properly.
See the Switcher Options section for more information.
|
|
Effect Looping |
Support has been added for looping effects a finite number of times. The effects to be looped can
not be transitions or already looped. For instance, a roll may be looped, but a page peel transition may not.
In order to loop an effect, the Effect Properties Panel has to be opened.
This can be accomplished by right-clicking on the FX or DSK picon to invoke the
Effect popup menu, and then selecting the Properties... menu item.
The Effect Properties Panel has a new User Loop Count numberbox control (to the right of
the Duration numberbox). This control will be enabled only for non-looped, non-transition effects.
The user can simply enter the number of times the effect should be looped and then trigger the effect.
In the example shown here, the Sample crawl effect will be looped five times
when triggered.
|
Router Input Color Correction support |
Color Correction support has been added for External Video Router inputs.
The Switcher application stores a table of Color Correction property sets for each
External Video Router input that contains non-standard values. When a router input is
selected, the table is searched for a corresponding Color Correction property set.
If one is found, the property set will be loaded to the corresponding GlobeCaster input
that the external video router input is routed to.
It should be noted that although certain Color Correction properties can be loaded nearly instantaneously
(i.e., Hue, Saturation, Luma, and Setup), other properties
(including many of the properties found in the Pro Color Correction panel)
may take a few frames to propagate. This may cause brief glitches if the user cuts from
one router input with one Color Correction property set to a router input with a different
Color Correction property set. In order to prevent undesired results, the following
measures are recommended:
- When possible, select an external video router input on the Preview bus and then perform a Cut,
rather than selecting the router input on the Program bus. That way, the input can be routed and
Color Correction property set loaded before it is shown on Program Out.
- Use more than the minimum number of connections between the External Video Router and the GlobeCaster.
If the user is cutting between two color-corrected keyed sets (i.e., a unique, color-corrected source
on Program, Preview, Key, and Key Preview), then it is strongly recommended that there be four connections.
That way, the Switcher application does not need to constantly re-route video sources and update
the Color Correction properties every time a Cut is performed. (The Switcher application
is programmed to perform as few routing changes as possible.)
|
Improved Clip PlayList support |
Modifications have been made in order to make the Clip PlayList feature easier to use.
In fact, the user doesn't even need to open the TMClip Playback/DDR Panel
at all in order to load and play back a Clip PlayList!
Quick Load
The user can load and play back a Clip PlayList in three steps:
- Load a Clip PlayList (.cpl) file by double-clicking on the file's picon in the bin
- Right-click on a softbutton and select the Clip Playlist (Rebuild) item from the
softbutton menu
- Select the CPL softbutton on the Program bus to begin playing the Clip PlayList.
(Or select CPL on the Preview bus and click on the Cut button.)
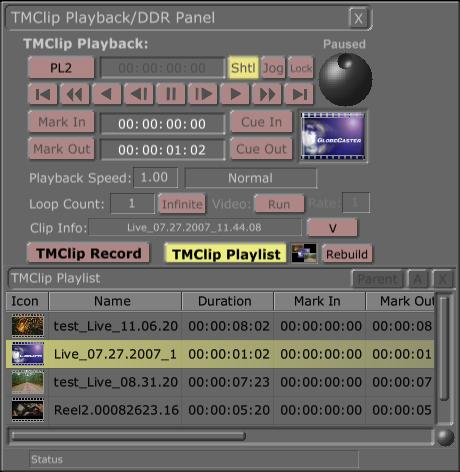
TMClip Playback/DDR Panel improvements
A Rebuild button has been added to the panel, to the right of the Clip PlayList picon.
The button is enabled when the Clip PlayList has just been loaded or has been modified.
Clicking on the button will rebuild the Clip PlayList and create a cpl softbutton in
the busrows, if it doesn't already exist
Minor additional functionality has been added to the transport controls when the PlayList is
selected. The Alt key can be held down so the Clip PlayList behaves more like a single clip.
Clicking on the First Frame (|<) button while holding down the Alt key will
send the Clip PlayList to the first frame of the PlayList (instead of jumping to the first frame of the previous clip).
Similarly, clicking on the Last Frame (>|) button while holding down the Alt key will
send the Clip PlayList to the last frame of the PlayList (instead of jumping to the first frame of the next clip).
|
True 16 Softbutton support |
Unlike the Switcher application of the previous version of software (3.2),
all 16 softbuttons are now completely configurable.
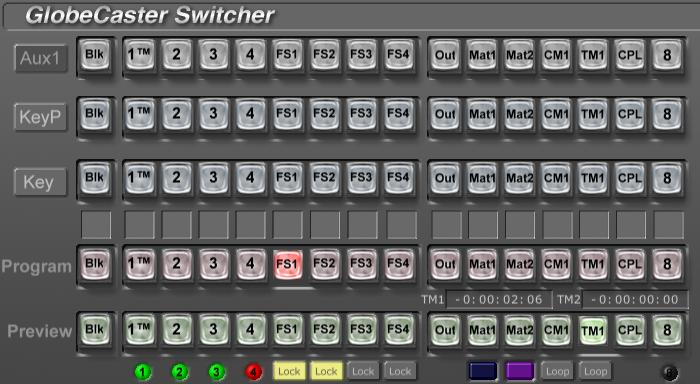
Furthermore, the status LEDs for each input (now numbered) will follow the position of the input softbutton.
This feature is especially useful for GC4000 users where, generally, only the first four inputs are used.
Here is an example of a remapping of the busrow so that only the first four
inputs are shown in their regular positions; the remaining four slots are used by commonly used FrameStores,
two of which are locked. (In this example, the last softbutton is configured as Input 8
in case a source is connected to an input card residing in an output slot.)
The softbutton popup menus have changed in order to accomodate this new feature. An example of a
softbutton menu, invoked by right-clicking on a softbutton representing an input card,
is shown here. Note that the four items of the menu's first section are
only visible when a softbutton corresponding to an input is clicked. The second section of the menu shown
allows the user to select a GlobeCaster or External Video Router input; when selected, a submenu will popup to allow
the user to select the specific input. The third section lists all of the internal sources that are available.
The last section contains menu items that allows the user to create a new source or modify the currently
selected source (such as Unload Framestore).
Here is another example of a softbutton menu. In this case,
the user clicked on an empty softbutton, so the input menu items (e.g., Input Settings) are not available.
Furthermore, no router was connected, and there are fewer internal sources available. In addition,
a new menu item, Clip Playlist (Rebuild), was available because the Clip PlayList had been recently loaded
but not built.
Additionally, the Switcher Options file can now store the references to the sources that are
used in the softbuttons. See Switcher Options Panel Improvements for more information.
|
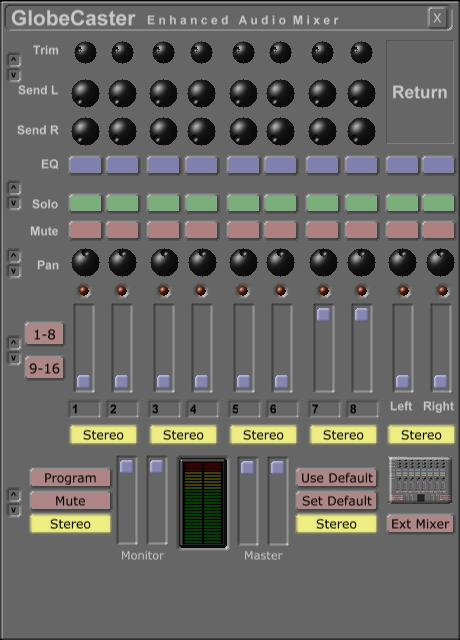
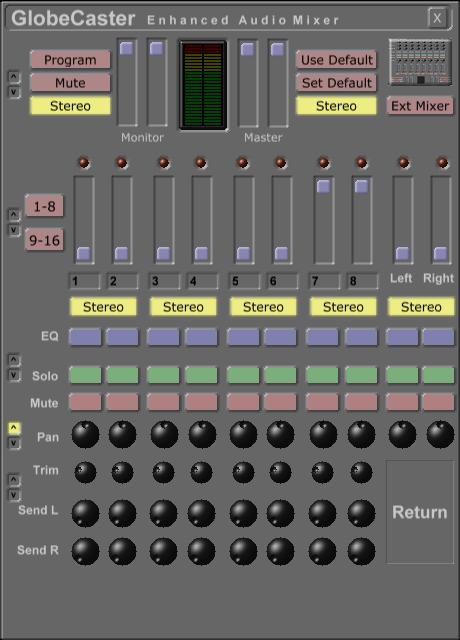
Configurable Audio Mixer panel |
As discussed above, the user can resize panels in order to make them bigger or smaller.
But since the upper left corner of the panel always corresponds to the same origin position,
it means that shrinking the Audio Mixer panel would obscure the Monitor and Master faders.
In order to allow the user to shrink the panel but still keep the most useful controls visible,
the Audio Mixer panel controls were split into five different "subpanels", or control sections:
Trim/Send, EQ/Solo/Mute, Pan, Input Faders, and Monitor/Master Faders.
(The Audio Mixer picon and Ext Mixer button have
been moved into the Monitor/Master Faders subpanel.) Each subpanel contains a pair of up & down arrow buttons,
as shown here. Clicking on the up & down arrow buttons will change
the relative position of each subpanel. These positions are saved when the application shuts
down and loaded when the application is executed.
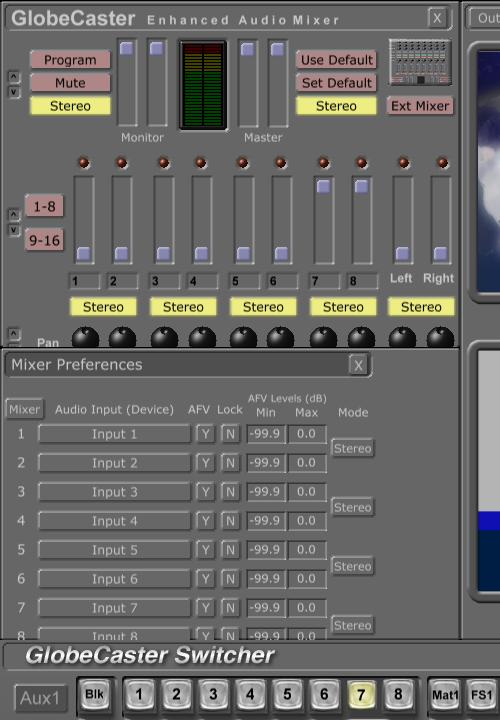
Suppose that the user wants to shrink the Audio Mixer panel so that the panel, and the Mixer Preferences panel,
can be shown in the upper left area of the interface without obscuring the main Switcher panel.
But the user doesn't want the fader controls hidden either. So the user would use the up and down arrow buttons
to reposition the subpanels, as described below.
The user can click on the up arrow button on the Monitor/Master subpanel until it reaches the top.
The user would then click on the up arrow button of the Input Faders subpanel until it is just below
the Monitor/Master subpanel.
The user decides that the Trim/Send subpanel isn't as useful and presses its down arrow button until
it reaches the bottom. The user then decides to have the Pan subpanel be visible and clicks on its
up arrow button (shown here).
Now that the subpanels have been positioned as desired, the user can shrink the Audio Mixer panelAudio Mixer panel.
Then the user opens the Mixer Preferences panel and click-drags on its TitleBar until it snaps to the bottom
of the Audio Mixer panel. Finally, the user resizes the Mixer Preferences panel until it no longer
obscures the main Switcher panel, as shown here.
There are a few issues that need to be pointed out:
- This subpanel functionality is only available in 1280 or higher resolution.
- Because the Audio Mixer panel is split up into subpanels that lie on top of the main panel,
resizing the panel may become difficult. For instance, if the user were to drag the bottom right corner
over the right-most Stereo button (below the Return Fader sliders), the user would no longer be
able to expand the panel by dragging on the right or bottom sides because the subpanels have focus.
(Note that the border edges on the right and bottom sides are no longer visible.) The user can expand the
panel again by clicking on the bottom left corner (where the border is visible) and dragging down until the border
is visible again, and then click on the bottom right corner to expand the width of the panel. Alternatively,
the user could click on the TitleBar and move the panel down and to the right, and then click on the upper left
corner and drag up and to the left.
|
Improved SoundFX support |
All four DSK picons now have a SoundFX picon associated with them. It should be noted that there are
still only two stereo pairs for playing TM Clip audio, so the user must consider when to run the effects
so that the audio of one effect does not interfere with the audio of another effect.
When dragging and dropping a clip shortcut (.lcp) file onto the SoundFX picon, the file's properties
are also read in (e.g., SourceIn and Length). These properties are then used to prepare the clip for
playing. (If the user does not wish to use the Length property, the user can right-click on the SoundFX picon
to invoke the SoundFX popup menu and select the Play Entire Clip menu item.)
Furthermore, an effect generated by the Animator/Compositor application (see below)
or Effects Generator application (see below)
may contain SoundFX properties embedded in the effect file .
Not only are the SourceIn and Length properties available for processing, but an Offset
property is also available, which allows the user to delay the playing of a SoundFX clip until it is appropriate
during the effect.
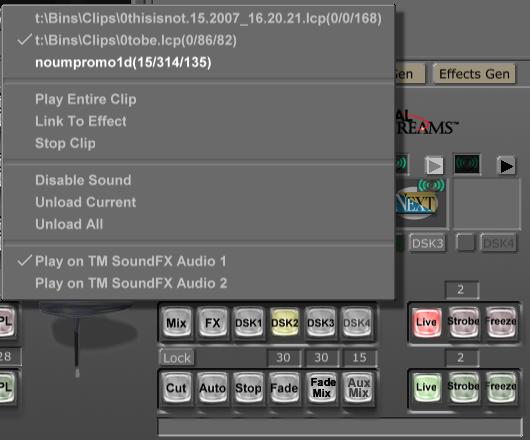
The SoundFX popup menu has been modified so that these three properties are visible
for review. After right-clicking on the SoundFX picon, the first section of the SoundFX popup menu will display
a list of names that refer to the TMClips that have been loaded. After each name is a triplet of numbers
that corresponds to the Offset, SourceIn, and Length of the clip.
|
Switcher Options Panel Improvements |
In addition to the Switcher Options Panel having a TitleBar for moving its position or changing its size
(shown here), there are three other new features, listed below.
Hotkey Busrow Mapping
There are four groups of hotkeys that allow the user to select sources on the four busrows. The 1024 resolution
Switcher interface has four busrows shown; the 1280 resolution Switcher interface shows five busrows, but the
user can use a hotkey (currently Tab) to determine whether it is the Key Preview or Aux busrow that the last group of
hotkeys corresponds to.
With the introduction of Macro busrows, there was a concern that the user would
want the last group of hotkeys to correspond to the fourth busrow, whether it be Key Preview, Aux, or one
of the Macro busrows. On the other hand, the user might need to select a source on Key Preview or Aux
when macro busrows were selected on the two upper busrows, which could be accomplish via hotkeys.
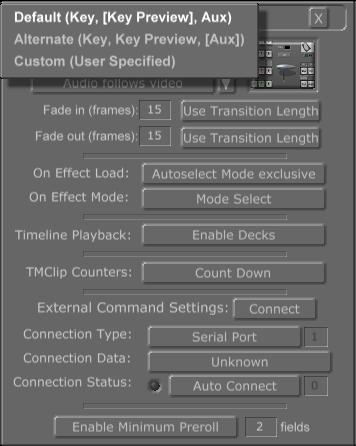
The choice has been provided to the user via the Hotkey Busrow Mapping button at the top
of the Switcher Options panel. Clicking on this button pops up a menu
that allows the user to select one of three mappings:
- Default (Key,[Key Preview], Aux): Uses the default mapping, where the third group of hotkeys is mapped to Key and the fourth group of hotkeys is mapped to Key Preview
- Alternate (Key, Key Preview, [Aux]): Uses the alernate mapping, where the third group of hotkeys is mapped to Key and the fourth group of hotkeys is mapped to Aux
- Custom (User Specified): Uses the custom mapping, where the third group of hotkeys corresponds
to the bus selected for the third busrow (the busrow above Program)
and the fourth group of hotkeys corresponds to the bus selected for the fourth busrow
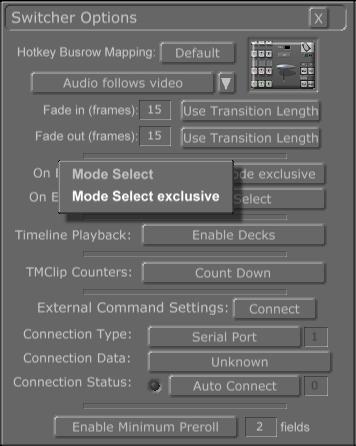
On Effect Mode
The On Effect Load button allows the user to specify what action to take when an effect is loaded.
One such option is Autoselect Mode exclusive, which enables that particular effect's mode button and
turns off all others in a mutually exclusive fashion.
An On Effect Mode button has been added so the user can perform a similar
action. Clicking on the button invokes a popup menu that allows the
user to select one of the following options:
- Mode Select: The effect mode is selected and no other action is taken (default)
- Mode Select exclusive: The effect mode is selected and all other effect modes are turned off
It should be noted that when using a Control Surface (CS-1000 or CS-100) in Mode Select exclusive mode,
the operator can press down multiple buttons at the same time and enable those specific modes. For instance,
if the FX and DSK1 mode buttons are on and the user presses both the DSK2 and DSK3 mode buttons, the DSK2 and DSK3
modes will be enabled while the FX and DSK1 modes would be disabled.
Saving Softmap source names
A menu item has been added to the right-click picon menu that allows the user to enable storing references
to the busrow's softbutton sources in a Switcher Options (.swo) file. When this option is enabled, along with the
Load/Save SoftMap in a file option, the user can save the entire SoftMap to the file and then reload
the SoftMap, and its corresponding sources, at a later date.
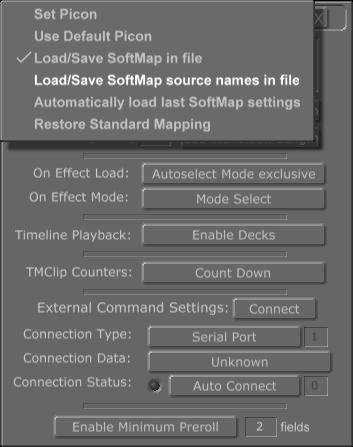
To enable saving the Softmap and source names, right-click on the Switcher Options picon. This will invoke
the picon popup menu. Select the Load/Save SoftMap in a file menu item, and then invoke the menu again
to select the Load/Save Softmap source names in file menu item (as shown here).
When they are both enabled, checkmarks should be shown next to them (as shown here).
To save the Softmap and source names, make sure that both options are checked.
Then simply drag the picon and drop it into a bin to create a Switcher Options file that contains the Softmap.
Loading the Softmap
To load the file's Softmap and source names, first make sure that both options are checked.
Then load the file by either double-clicking its picon in the bin, or by dragging the picon from the
bin and dropping it onto the Switcher Options picon.
Alternatively, the user can opt to automatically load the most recent Softmap when the Switcher application starts.
When a Switcher Options file is saved with a Softmap, the name of that file is stored internally.
If the auto-load option is enabled, the name of the most recently saved file is retrieved and that file
will be loaded when the Switcher application begins.
To enable this option, right-click on the Switcher Options picon; this will invoke
the picon popup menu. Select the Automatically load last Softmap settings menu item
(as shown here). When it is enabled, a check mark should be shown next to the menu item.
|
FS Lock button |
A Lock button has been added below a Framestore softbutton.
Enabling the Lock button gives the Framestore object a higher priority, which means that it is less likely to
be replaced with a new softbutton object (such as a Time Machine Clip) that is loaded via double-clicking on a bin picon.
This can be used to ensure that a commonly used Framestore will remain in the busrow so the user doesn't have
to search for and load the source from the bin again, were it to get replaced by another object. In the example
shown here, commonly used Framestores 1 and 2 are locked, while Framestores 3 and 4
are not.
|
Remembers AP-100 setting when booting up and reconnects |
For customers that use the AP-100 external device, the interface has been streamlined so that
it is not necessary to manually reconnect the device every time the Switcher application
is executed. If the user wants the AP-100 to automatically reconnect the next time the application is executed,
perform the following steps:
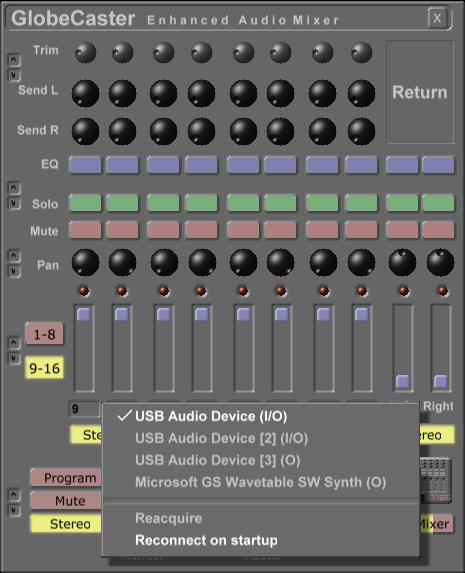
- Open the Audio Mixer panel via the Panels popup menu or hotkey (currently Control+A)
- Click on the Ext Mixer button to invoke the External Mixer popup menu
- Connect to the AP-100, if not already connected
- Select the Reconnect on startup menu item, as shown here.
- When the Reconnect on startup menu item is enabled, a checkmark should appear next to it
|
Specify DSK for A/C & CG effect testing |
The user can now specify which DSK to use for the Animator/Compositor and
Character Generator applications when testing the effect's video. By default,
both applications use DSK1, the Switcher card's downstream graphic resources (which prevents
the user from running an effect while testing an effect being created in the two
applications). By using the DSK Effect popup menu, the user can specify which DSKs to
use for testing and thus avoid any resource conflicts.
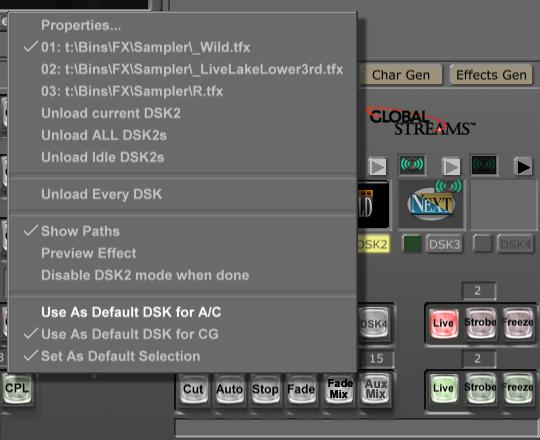
Right-click on the DSK picon to invoke its Effect popup menu. Two new menu items have been
added: Use As Default DSK for A/C and Use As Default DSK for CG.
Simply select either one to choose the current DSK as the one to use for testing the application's effect's video.
When a DSK is selected, a checkmark will appear next to its menu item. In the example shown
here, the Effect popup menu for DSK2 indicates that it is
the default DSK for the Character Generator application. The figure also shows that
DSK2 is the default selection (destination) when loading a DSK by double-clicking on its picon in a bin.
|
Preselect Keyer Mode |
A right-click popup menu has been added to the Keyer Mode button.
There are two menu items in the popup menu, each of which invoke the keyer mode popup menu as a submenu:
- Preselect Key Mode: Allows the user to preselect the keyer mode before a source is selected
- Select KeyPreview Mode: Allows the user to select the keyer mode for the source selected on Key Preview,
thus allowing the user to switch to a different keyer mode when a Cut operation is performed
|
Effect Preview improvement |
When previewing a short effect in software, such as a one frame overlay, it may be difficult to
see the effect since it ends so quickly. Thus, for an effect that is shorter than five frames,
the delay in advancing the effect to the next frame has been increased so the user has a chance
to watch the effect progress slowly.
To preview an effect in software (so that it shows up in the Preview Monitor), right-click on the appropriate
effect picon to invoke the Effect popup menu and choose the Preview Effect menu item.
|
|
|
|
Editor
|
| Feature |
The How
To's |
Animated Dissolves |
The user can now animate how a dissolve fades between two sources in much the same way the audio level is animated.
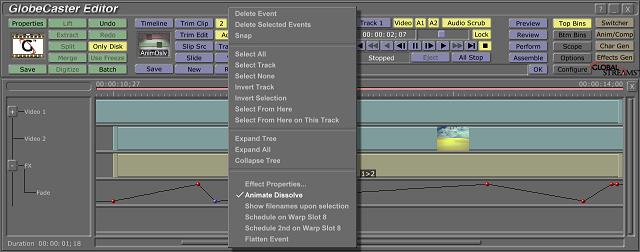
To animate a dissolve effect, right-click on the dissolve timeline event and select Animate Dissovle
from the popup menu. A child value track named Fade will be created (if it doesn't already exist) and
keyframes will be automatically generated at the start and end of the dissolve event. The range of keyframe
values is 0 (no mix) to 511 (full mix). Otherwise, the keyframes are similar to those used in the
audio Level tracks, including the constraint that the keyframes at the ends of the event can not be moved
to a different position.
If the user decides not to animate the effect, it is not necessary to remove the keyframes or delete the dissolve
effect and replace it with a new one. The user can simply right-click on the effect to invoke the popup menu and
click on the Animate Dissolve menu item. This will disable the animation until the user toggles the
state again (by clicking on the menu item again).
A checkmark next to the Animate Dissolve menu item indicates that animation is enabled.
An example of a timeline with an animated dissolve, and its right-click popup menu invoked,
is shown here.
Note that the checkmark indicates that the animation is enabled.
|
|
|
Batch Digitize
|
| Feature |
The How
To's |
Importing multiple files |
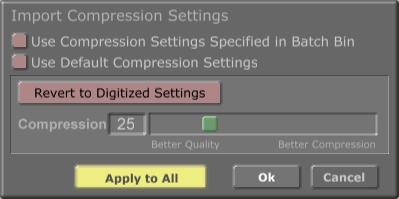
When importing media files via Batch Digitize, the user should no longer need to set the compression
ratio for each file if they are the same. The Import Compression Settings panel
has been modified to give the user the option of specifying that the values should be applied to all
files to be imported. A description of the panel's controls are described below:
| Use Compression Settings Specified In Batch Bin |
Toggling this button on indicates that the compression setting specified in the Batch Bin's Compression column
should be used instead of the value in the panel's Compression numberbox. |
| Use Default Compression Settings |
Toggling this button on indicates that the default compression setting will be used. |
| Revert to Digitized Settings |
Clicking this button sets the Compression numberbox and slider value to the one specified
by the Digitize Settings panel's Time Machine Quality Level control.
|
| Compression |
The user can change the compression value via the numberbox or slider. A low compression value
corresponds to better quality, while a high compression value corresponds to less quality. |
| Apply To All |
Toggling this button on indicates that the compression settings specified in the file
should be applied to all of the remaining files to import. |
| Ok |
Import the file(s). |
| Cancel |
Cancel file import. |
|
|
|
Animator/Compositor
|
| Feature |
The How
To's |
Sound Effect Action Track |
A Time Machine Clip with audio can now be loaded into the Animator/Compositor timeline so that when
the user creates an effect, the user can make sure the desired sound will be properly synched up with the effect.
(See above for more information on SoundFX in Switcher
vis-a-vis Animator/Compositor.)
A Time Machine clip can be loaded as a SoundFX clip in one of two ways. The picon of the clip can be
dragged from the bin and dropped into the timeline; the clip will start at the position where the picon was
dropped. Or, if the clip contains audio and no video, the user can simply double-click on the picon;
in this case, the clip will be positioned on the first frame. (If the clip contains video, it will be
loaded as a stroke.) The resulting clip will be placed in the track labelled Sound Effect,
as shown here. If the track doesn't exist, it will automatically be created.
Only one event can exist in the Sound Effect track. If the user attempts to load another file,
a dialog box will pop up querying the user if the current clip should be replaced. If the user clicks
on the Yes button, the clip will be replaced with the new one at the current position. If the new
clip is shorter, the length of the clip will be adjusted properly.
Changing the length of the event changes its Length property.
Moving the event changes its Offset property.
Trimming in the event changes all three properties (Offset, SourceIn, and Length).
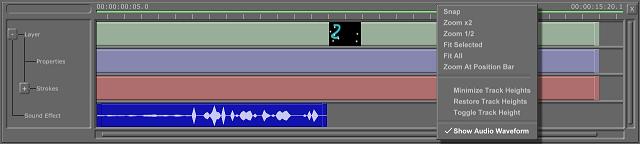
The user also has the option to display the audio waveform on the event. Right-click on the sound effect event
to invoke the popup menu and select the Show Audio Waveform menu item. A checkmark will appear next to the menu item when it is enabled, as shown
here. The user can disable the audio waveform by toggling the menu item off.
Note that the audio event is displayed on only one track.
Therefore, the audio waveform of only one audio channel
is displayed. The default channel is Audio Channel 1 (the left channel of the TM Clip stereo pair).
If the Audio 1 component is not enabled, then the audio waveform of Audio Channel 2
(the right channel of the TM Clip stereo pair) is displayed.
When the user saves the effect to a file, the file will contain the reference to the clip as well as
the three properties. Furthermore, the effect picon will have an audio icon on it to indicate that
it contains SoundFX information. When the user loads the file into the Switcher application, the clip and its
properties will automatically be loaded as well.
There are a few issues that need to be remarked upon:
- In order to play back a TM Clip in the Sound Effect track, the Switcher application must be
executed so that the Time Machine audio can be routed properly. Use the Switcher application's
Mixer Preferences panel and Audio Mixer panel to configure the level of the Time Machine audio.
- It is important to note that the timing of the audio playback will not necessarily correspond to the
timing of the effect. This is because the audio plays back in real-time, but the effect is rendered in
software on the fly. Thus, depending on the complexity of the effect, the effect may play faster or slower
than the audio (which always plays in real-time). Therefore, it is recommended that the user trim in to
the portion of the audio that needs to be synched up with the effect, position the audio event accordingly,
and then click-drag the audio event's left handle to where the audio should start.
|
'Telestrator' Support |
If the user wants to use Animator/Compositor to paint directly onto Program Out, the user
can open the Workspace Properties panel to toggle on the Alpha button and Video button.
When Alpha has been enabled, a gray and black checkerboard pattern is shown in the background
(rather than just a solid black background). However, if the user is trying to paint over a specific
portion of Program, such as a color commentator using a telestrator at a sporting event,
the user has to guess at the corresponding location in the workspace before drawing.
In order to take the guesswork out of the process,
new functionality has been added that allows the user to snap a
shot of Program Out and use that as the workspace background instead of the checkerboard pattern.
This way, the user can see exactly which portion of the workspace needs to be painted over.
Note that this snapshot of Program Out is only used for the background; it is not considered a stroke.
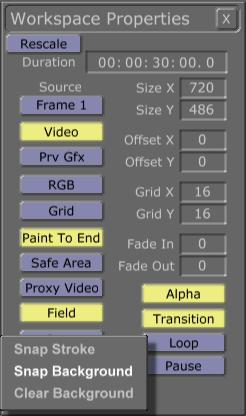
To use a snapshot of Program Out as the background, the user must open up the Workspace Properties panel.
First, click on the Alpha button if it is not already toggled on. Then click on the Snap button,
which invokes the Snap popup menu, and select Snap Background.
The Snap popup menu has three menu items, which are described below:
- Snap Stroke: Use a snapshot of Program Out to create an image stroke (original Snap button functionality)
- Snap Background: Use a snapshot of Program Out to create a background image when in Alpha mode
- Clear Background: Clear the snapshot and use the standard checkerboard background for Alpha mode
|
Alpha Export Support |
When exporting an Animator/Compositor project to an AVI, the Alpha mode was automatically turned off
to create a simple RGB video. Now, the user has a choice of including the Alpha in the AVI file.
A Save with Alpha button has been added to the AVI Export panel. If the project did not have
Alpha enabled, this button is disabled. If the project did have Alpha enabled, then the button is active
but initially toggled off. It is up to the user to toggle the Save with Alpha button on before
exporting to an AVI file. In the figure shown here, the Save with Alpha
button has been toggled on so the alpha will be stored in the AVI file.
It should be noted that many codecs do not seem to support alpha. If the alpha needs to be saved to the file,
it is recommended that the user export to an Uncompressed AVI file.
|
Timeline Popup menus modified |
A minor change has been made to the Animator/Compositor right-click timeline menus.
Specifically, the Toggle Track Height menu item has been grouped with the
Minimize Track Heights and Restore Track Heights menu items.
An example of the menu
invoked by right-clicking on a stroke with an animated position is shown here.
An example of the menu invoked by right-clicking on the Sound Effect track is shown here.
|
|
|
Effects Generator
|
| Feature |
The How
To's |
Sound Effect Action Track |
A Time Machine Clip with audio can now be loaded into the Effects Generator timeline so that when
the user creates an effect, the user can make sure the desired sound will be properly synched up with the effect.
(See above for more information on SoundFX in Switcher
vis-a-vis Effects Generator.)
A Time Machine clip can be loaded as a SoundFX clip in one of two ways. The picon of the clip can be
dragged from the bin and dropped into the timeline; the clip will start at the position where the picon was
dropped. Or the user can simply double-click on the picon;
in this case, the clip will be positioned on the first frame.
The resulting clip will be placed in the track labelled Sound Effect,
as shown here. If the track doesn't exist, it will automatically be created.
Only one event can exist in the Sound Effect track. If the user attempts to load another file,
a dialog box will pop up querying the user if the current clip should be replaced. If the user clicks
on the Yes button, the clip will be replaced with the new one at the current position. If the new
clip is shorter, the length of the clip will be adjusted properly.
Changing the length of the event changes its Length property.
Moving the event changes its Offset property.
Trimming in the event changes all three properties (Offset, SourceIn, and Length).
The user also has the option to display the audio waveform on the event.
Right-click on the sound effect event to invoke the popup menu and select the Show Audio Waveform
menu item. A checkmark will appear next to the menu item when it is enabled, as shown here.
The user can disable the audio waveform by toggling the menu item off.
Note that the audio event is displayed on only one track.
Therefore, the audio waveform of only one audio channel is displayed. The default channel is Audio Channel 1
(the left channel of the TM Clip stereo pair). If the Audio 1 component is not enabled,
then the audio waveform of Audio Channel 2 (the right channel of the TM Clip stereo pair) is displayed.
When the user saves the effect to a file, the file will contain the reference to the clip as well as the
three properties. Furthermore, the effect picon will have an audio icon on it to indicate that it contains
SoundFX information. When the user loads the file into the Switcher application,
the clip and its properties will automatically be loaded as well.
There are a few issues that need to be remarked upon:
- In order to play back a TM Clip in the Sound Effect track, the Switcher application must be
executed so that the Time Machine audio can be routed properly. Use the Switcher application's
Mixer Preferences panel and Audio Mixer panel to configure the level of the Time Machine audio.
- It is important to note that the timing of the audio playback will not necessarily correspond to the
timing of the effect when rendering the effect in software. This is because the audio plays back in real-time,
but the effect is rendered in software on the fly. Thus, depending on the complexity of the effect, the effect may play faster or slower
than the audio (which always plays in real-time). Therefore, it is recommended that the user trim in to
the portion of the audio that needs to be synched up with the effect, position the audio event accordingly,
and then click-drag the audio event's left handle to where the audio should start.
- If the effect is created and executed by the GlobeCaster, the timing should be correct.
|
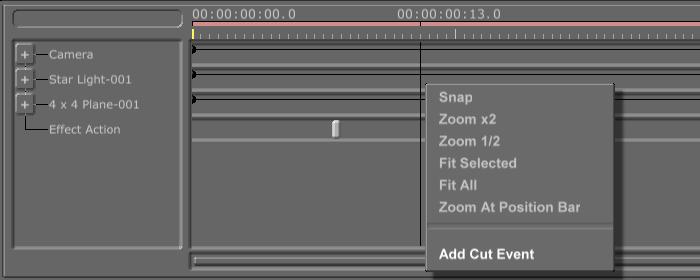
Effect Action Track |
The user can now add events to a timeline that will trigger a cut during the effect's execution.
To add an event, place the position bar at the desired location on the timeline, right-click (where the
tick marks and timecode are) to display the popup timeline menu, and select "Add Cut Event".
This will create an Effect Action track (if it didn't already exist) and add an event.
Once the Effect Action track is created, the user can add another Cut Event by right-clicking
on the track to bring up a smaller menu and select "Add Cut Event", as shown here
Note that these Cut Events are triggered relative to the beginning of the effect;
they are not delayed if a pause or loop occurs.
|
| | | | |