| Feature |
The How To's |
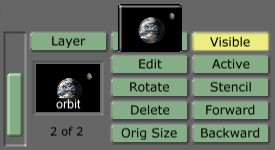
Save/Load Layers
|
You can now save an individual layer by click-dragging the Layer Picon and dropping it into a bin, which creates a .PPL file.
The animated properties, geometry, and strokes of the layer are saved in the .PPL file. The file can then be loaded either by double-clicking on the file in the bin, or by dragging the file onto the Layer Picon. In either case, the layer is always added to the project as the last layer.
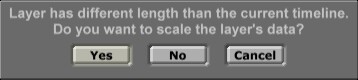
If a layer is loaded that has a different length than the timeline, you are prompted to determine whether the loaded layer should be rescaled.
Select "Yes" to scale the layer to the project's duration, select "No" to leave the layer the same length, or select "Cancel" to abort the load. If you select "No" with a layer that has animated properties, the animation may appear to abort early or complete quicker than expected.
|
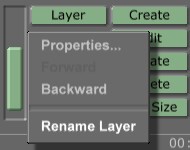
Rename A Layer
|
You can now name a layer by right-clicking in the Layer Picon to invoke the pop-up menu and select "Rename Layer".
This allows you to edit the name of the layer in the Layer Picon (it is the same as renaming the Project via the Workspace picon) by typing in the new name and pressing [Enter]. The corresponding layer event in the timeline is also reset to this new name.
|
Reset/Key Buttons
|
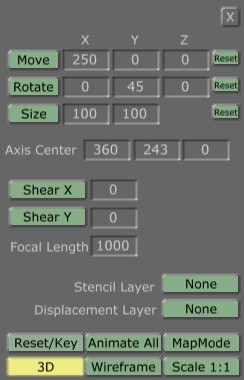
The Layer Properties Panel has new "Reset" buttons so that you can reset all or part of the layer's geometry, simply click a button rather than typing in the default values.
Clicking on the "Reset" to the right of the Move restores the position values to 0.
Clicking on the "Reset" to the right of the Rotate restores the rotation values to 0.
Clicking on the "Reset" to the right of the Scale restores the scale values to 100.
Clicking on the "Reset/Key" button restores all of the Layer Property values to their default value.
|
Tab Order
|
Added tab ordering to the EditBoxes in panels that have a lot of them, including the Stroke, Layer, & Workspace panels
|
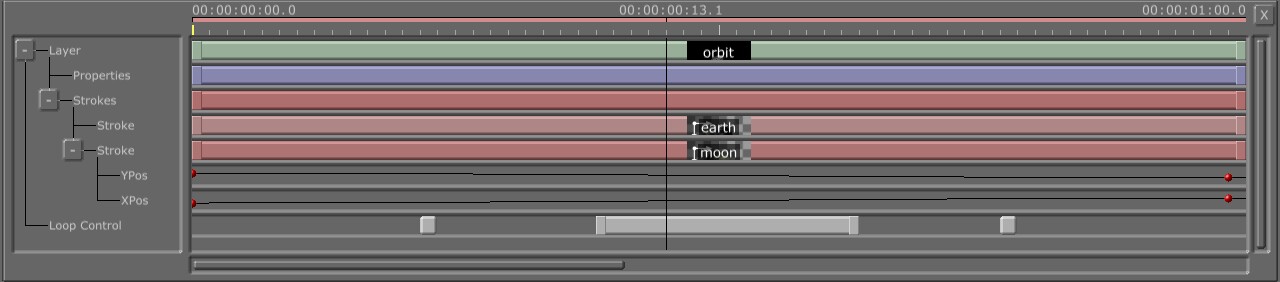
Loop Control Track
|
Support has been added to allow multiple pause points and/or multiple loops by slightly modifying the functionality of the Loop and Pause buttons of the Workspace Properties Panel and by adding a Loop Control track to the timeline (it is the same in Effects Generator).
When the Pause button is pressed and released, a Pause event is added to the Loop Control track where the position bar is located. When the Loop button is pressed and released, a Loop Event is created; it starts at the position bar's location and ends at the end of the project, or before the next Pause event in the Loop Control track.
In this figure here, a timeline has been created with two pause points and an 8 frame loop between them.
In order to create a project that is just one large loop, make sure all loop events and pause events have been removed from the Loop Control Track, move the position bar to the start of the timeline, and click on the Loop button.
Please note that projects created in a previous version of GlobeCaster, the pause funtion must be reapplied if you with to modify the project in version 3.1.
|
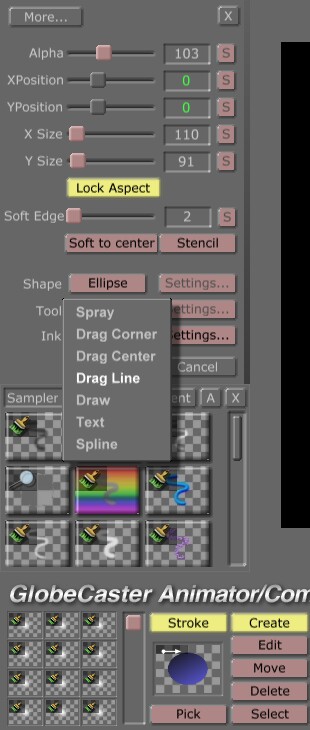
Drag-Line Tool
|
You can now select a "Drag Line" tool from the Tool pop-up menu of the Stroke Properties Panel's Tool button. To use the Drag Line tool, click the mouse button at the start position, drag the mouse to the end point (with the button still pressed), and then release.
|
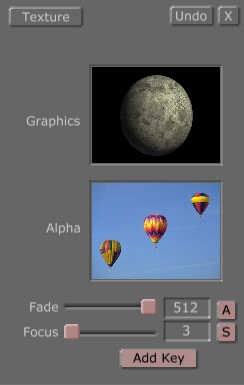
Fade/Focus Animation
|
The Texture Properties Panel has been modified to support additional functionality for the Fade and Focus properties.
An editbox has been added for each so the user can easily insert a specific value. Fade and Focus can now be animated, similar to a stroke's position and size; a button has been added to each so that you can invoke the Animation Status pop-up menu for each of the two properties.
|
Rescaling Options
|
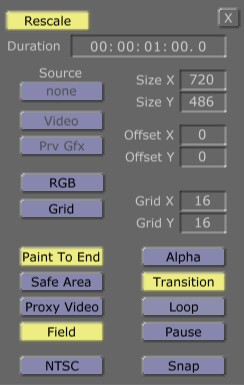
Dropping a file with an image sequence (such as a TM Clip) into the workspace as a stroke that has a duration that differs from the workspace duration will bring up a dialog box that prompts you to change the workspace's duration to match.
Now, you have the additional option of rescaling the project's timeline to fit rather than simply changing the duration. For instance, if a clip file is longer than the project, the user would be prompted with a dialog box shown in this figure.
|
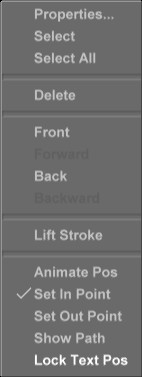
Lock Text Position Menu Item
|
You can edit a text stroke by selecting the text stroke and going into edit mode. This creates an outline with scaling tabs around the stroke, as well as a position tab for each character.
You can scale the text by click-dragging one of the scaling tabs and can also change the position of a specific chacter by click-dragging one of the character position tabs.
However, changing the scale normally ignores the custom position of each character. Therefore, a "Lock Text Position" menu item has been added to the stroke's right-click pop-up menu. Enabling this will "lock" the individual characters of a text stroke to the position that you specify; rescaling the stroke will no longer change the position of each character.
|
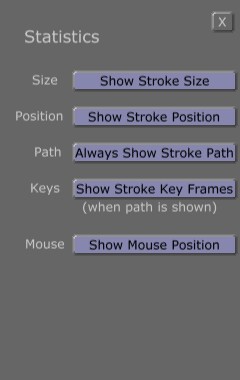
"Always Show Path" Button
|
The Stats Panel has been slightly modified, including the addition of a new "Always Show Stroke Path" button. You can see the path of a stroke, you can now toggle on the "Always Show Stroke Path" button, rather than having to right-click on each stroke and selecting "Show Path". (Remember that the path and other data is not shown until the stroke is selected.)
|
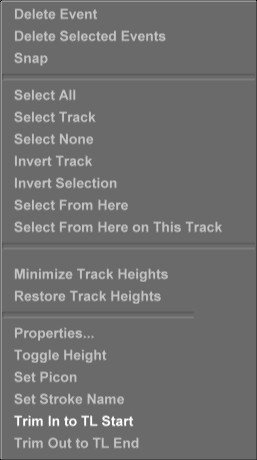
Trim to TL Start/End - New Menu Items
|
Occasionally, an event may be created that does not start at the beginning of the timeline and/or does not end at the end of the timeline. Rather than trimming in the event to the beginning of the timeline by dragging the event handle with the mouse, you can now right-click on the event to pop-up the Event Pop-Up Menu and select "Trim In to TL Start". Similarly, you can select "Trim Out to TL End" to make sure the event ends when the timeline ends.
|
Text style Accelerators
|
Added new accelerators for toggling the text style of selected text strokes.
| Text Style Accelerators
| | CTRL+B | Toggle Bold Style |
| CTRL+I | Toggle Italic Style |
| CTRL+U | Toggle Underline Style
(previously an Undo accelerator key--use Ctrl+Z for Undo) |
|